OBOE Interactive Fingering Chart
- Google Slides™

What educators are saying
Description
OBOE INTERACTIVE FINGERING CHART
Did you ever wish you had a reference teacher on their major instrument showing your oboe players helpful tips, suggestions, and troubleshooting advice on certain notes on the oboe? Or perhaps you also wanted an explanation of an alternate fingering or an example? Maybe you wanted someone to explain certain fingerings that are more favorable and why? For some notes that may have extreme tuning tendencies, would you ever want an expert helping your oboe students when needed? In addition, what if that expert was reinforcing proper fundamentals on each lesson? Watch this OVERVIEW DEMO VIDEO
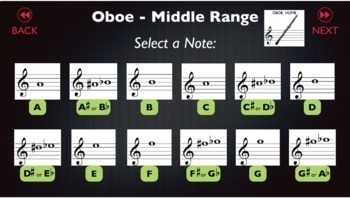
Presenting the OBOE INTERACTIVE FINGERING CHART. This Google slides file can be shared/pushed out to students like a mini-website. Everything is set up to navigate with a touch screen or mouse clicks on a computer. Hint: on a phone, the visual aspect may be easier to navigate when holding it horizontally.
FEATURES:
- A page (slide) for each note in the oboe range fingering chart from low “B-flat” up to high “F” above the staff.
- A specific range is organized for ease of navigation by each register, plus an additional section dedicated to the “typical” first 5 notes taught.
- Each note (slide) displays the ideal fingering(s)
- Each note (slide) displays a picture of the note on the staff as well as the note name (including enharmonic spelling)
- Each note (slide) offers a sound sample of the note on the oboe (for reference or to practice matching pitch.
- Each note (slide) offers a mini-lesson help video. The fingerings and note-on-the-staff pics also appear within each mini-lesson video. The lesson videos are hyperlinked unlisted YouTube videos recorded specifically for this project. WATCH A SAMPLE MINI-LESSON
- For notes that may have a typical intonation concern. (Ie: “this note tends to have a sharp tendency”), there is a description arrow indicator next to the note on the staff.
- An additional set of extra mini oboe lessons addressing reed care, audio reed crowing exercises, different register tips, instrument carriage & identifying the mechanical key-work and proper playing posture
- A total of 34 video mini-lessons along with other visual material
PLEASE READ THE PUBLISHING INSTRUCTIONS FURTHER BELOW CAREFULLY TO BE ABLE TO CREATE A NON-EDITABLE WEB PRESENTATION OF THIS FOR YOUR STUDENTS TO PRACTICE WITH!
You can easily email the link to the students, or link it to whichever online student portal platform your district uses. Students can use a phone, tablet, or computer. (please note that it will act buggy if using an Apple magic mouse or magic trackpad with swiping/clicking)
Other Ideas:
- Have your beginners use the 1st 5 note lessons as a daily practice for the first 1-2 weeks
- Have your beginners use links for the 1st playing activities and tonguing practice in the portion of the extra lesson as a daily practice or use in band class with speakers day-to-day for section practice
- Assign a specific group of “new” notes or an entire register when needed for further along beginners or 2nd/3rd-year players as a home-help project/homework
- Use any material as a review for struggling students during class if they cannot keep up with note reading or have fundamental issues in certain ranges
PUBLISHING INSTRUCTIONS
- After downloading this product, save (or make a backup copy) in your google drive.
- After opening it in your google drive, click the yellow "share" button in the upper right corner
- Another window will open up. with 2 bubbled options. Click on the lower bubble somewhere where it says "get link". Make sure it is not a restricted link, and "anyone with the link" is selected. This is especially important if you are using a google drive account managed by your school district, as it may be selected by default to be restricted only in your school district.
- Click the blue "Done" button.
- Make sure the selected slide on the left panel is slide number 1 (which it should by default)
- Click the white "present/play" button in the upper right corner, just next to the "share" button. Most browsers will present in "full screen" mode, if so, hit the "ESC" escape button on your keyboard.
- You'll notice that the slides were playing out on their own automatically, and/or there was a navigation pane in one of the lower corners.
- Find the chunk in the URL that says: /edit#slide=id.p1 - near the end of the URL
- Delete that small chunk and replace it with this: /preview?rm=minimal - then copy the entire fun URL address, hit enter/return key
- This is now how the google interactive chart can run, without a navigation pane or the ability to edit. It will now work with just the embedded links I've created.
- This is the link you will use to share with your students.
Related Products:
FLUTE Interactive Fingering Chart
BASSOON Interactive Fingering Chart
CLARINET Interactive Fingering Chart
ALTO SAX Interactive Fingering Chart
TENOR SAX Interactive Fingering Chart
Band Full Range Note Names and Fingerings Practice Quizzes
Terms of use:
All products in the ultimate Band Room store may not be shared or given to other band teachers or band programs. The purchaser of this teaching product or resource may create copies for their own students or their instrumental program as needed. The purchaser may continue to use the product at a different school if they change jobs to another school instrumental program in the future.
This also includes: If using portions or all of these products on “Canvas”, be sure to avoid sharing any page, assignment, module, or assessment on the “commons” that contain these resources, as it is also sharing this copyrighted material.


